Also from '11

Friday, March 29, 2013
Wednesday, March 27, 2013
Hand Painted Shirts
 Hubby's birthday came around this year and Max made him the best present ever - hand painted t-shirts. Hubby loves his t-shirts, and Max loves painting. A perfect project.
I got out my supply of fabric paint, let Max pick out the colors, gave him a paint brush, and let him go to town. To up the cuteness, I had him put a hand print on each. :) He made two, one on blue and one on black. I let them dry completely, then went over them with a hot iron to set the paint. They're holding up great, and hubby loves them.

Tuesday, March 26, 2013
Demo!
It's time. The room that has been haunting me since we moved into this house - the cluttered, dirty, smelly room, aka the 3rd bedroom/laundry room - is being renovated! This room has seriously been the bane of my existence ever since we moved in.
The previous homeowners lived in the house from 1936 until they passed away of old age. He passed in the late 80's, but when he retired he thought himself quite the craftsman and built an obscene amount of built-in cabinetry in the house. One of my main projects for renovation has just been removing those darn built-ins. They also loved wood paneling. Every. Single. Room. Except the bathrooms, one of which has wallpaper paneling, the other has tile paneling. <sigh> She outlived her husband by 15-20ish years, and was unable to go up and down down the stairs after a while - hence this room. They added a 3/4 bath into the room, with an unfortunate sliding door that can't close if you're sitting on the toilet, and a ventilation pipe that is just a horrible eyesore. Also, she had at least one dog that hung out with her in this room a lot. And apparently it had bladder issues.
So, first point of business: Remove the built-ins, the sliding door, and the ventilation tube (since if there's no door, it'll ventilate just fine).
This is an almost-before shot, there used to be a large closet all the way on the left that we removed months ago.

Another before:

And that same wall, after:

Bathroom wall before:

And after:

And, don't forget the demo pile!

I'll be sorting the leftovers into usable versus throw away. Unfortunately, rather than building cabinets and attaching them to the wall, he built them directly into the wall, so most of the cabinets turned into so much kindling. I was able to salvage one small cabinet, which will go over the washer and dryer.
Major props to hubby - he's never been much for tools, but he stepped up and did all of this (with some assistance/advise from yours truly, who has much more tool experience).
Next up: Tearing out the stinky/sticky floor and replacing it. Trust me, it's not worth refinishing.
The previous homeowners lived in the house from 1936 until they passed away of old age. He passed in the late 80's, but when he retired he thought himself quite the craftsman and built an obscene amount of built-in cabinetry in the house. One of my main projects for renovation has just been removing those darn built-ins. They also loved wood paneling. Every. Single. Room. Except the bathrooms, one of which has wallpaper paneling, the other has tile paneling. <sigh> She outlived her husband by 15-20ish years, and was unable to go up and down down the stairs after a while - hence this room. They added a 3/4 bath into the room, with an unfortunate sliding door that can't close if you're sitting on the toilet, and a ventilation pipe that is just a horrible eyesore. Also, she had at least one dog that hung out with her in this room a lot. And apparently it had bladder issues.
So, first point of business: Remove the built-ins, the sliding door, and the ventilation tube (since if there's no door, it'll ventilate just fine).
This is an almost-before shot, there used to be a large closet all the way on the left that we removed months ago.
Another before:

And that same wall, after:

Bathroom wall before:

And after:

And, don't forget the demo pile!
I'll be sorting the leftovers into usable versus throw away. Unfortunately, rather than building cabinets and attaching them to the wall, he built them directly into the wall, so most of the cabinets turned into so much kindling. I was able to salvage one small cabinet, which will go over the washer and dryer.
Major props to hubby - he's never been much for tools, but he stepped up and did all of this (with some assistance/advise from yours truly, who has much more tool experience).
Next up: Tearing out the stinky/sticky floor and replacing it. Trust me, it's not worth refinishing.
Monday, March 25, 2013
Open Season on Coloring
 Max has been very responsible with his marker and crayon use lately, so I've just been leaving his favorite coloring book (TMNT!) and a cup of markers out on his table. So far so good - and he's loving it!
I'm really liking this whole giving-responsibility thing, and having him respond so well.

Friday, March 22, 2013
Wednesday, March 20, 2013
K-cup Seed Starting
 I work in an office, and offices nowadays have K-cup machines. AKA individual little plastic thingies to make coffee that aren't recyclable or compostable. But - they are reusable!
I've had a jar next to the coffee machine for the last month or so, asking people to save their cups for me. I've been taking them home and prepping a week's worth or so at a time.
Cut the top off (which is recyclable metal, if your recycling center will take small pieces), scrape out the coffee grounds (and put them in the compost), and you're left with a paper filter inside of a little plastic container that has a built-in drainage hole. Perfect!
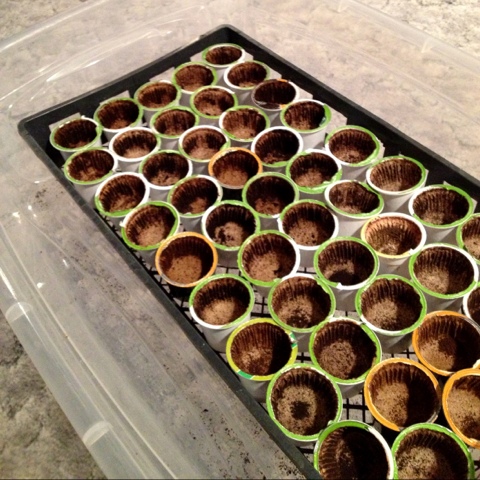 I lined them up on a seed tray set in a clear tote (which works as a mini greenhouse), added potting soil and seeds, and gave them a good watering.
For even more re-use fun, I cut old twist ties in half and used them as color-coded seed markers. Since I'm starting a lot of tomatoes, I put a dozen or so in their own "greenhouse" - a salad container that my mom saved for me.
A nice part about the cups, since the liner stops a few mm above the plastic, if there's a little bit of water in the bottom of the tray you don't have to worry about the dirt sitting in water - they're already elevated. AND, in theory I should be able to cut out the paper and plant that directly in the ground along with the seedling.
 |
| c'mon baby tomatoes! |
Tuesday, March 19, 2013
Inspiration for the Pool Hole Landscape
Now that the weather is warming - I'm back to scheming (about the landscaping). I've discussed the pool hole before and how I want to change it - but here's a bit more.
I've lined up a few burly guys (for a donation to their rugby club) to do the manual labor of tearing out a fairly large raised bed and dumping that dirt into the pool hole to improve the slope a bit, reshape the edge of the hole for drainage, add a dry creek bed with rocks from the raised bed (again for drainage - water goes amongst the rocks instead of on the surface area), and fill in with more dirt as needed. It's a big project, but the result is better backyard access (with the raised bed gone), a play area for Max, and a beautiful area instead of an eyesore!
Once that's in, I'll be adding landscaping... think lots of daylilies along the upper slope, a few hostas along the edges, maybe some amaranth or quinoa for height here and there. And ornamental grass, beautiful and easy!
A little visual inspiration: (click image for source)
 |
| from our visit to the Montreal Botanical Gardens |
 |
| from our visit to the Montreal Botanical Gardens |
Monday, March 18, 2013
Treasure Hunt

It took him a while to get warmed up to the idea, it was his first scavenget hunt after all. But by the last few clues he was right into it. The treasure was "buried" in with the pots and pans, and was a small mason jar with four cookies inside. He ate two immediately, and later that evening he shared the last of them with daddy and me. Such a sweet boy!

Friday, March 15, 2013
Wednesday, March 13, 2013
Painting Around Carpeting


Tuesday, March 12, 2013
Painting the Livingroom
 |
| VOC-free primer and a patient toddler |
But paint (and a crowbar) fixes a lot of ugly. Take the living room - remember this demo? That made a huge difference in the room. I still have some patching to do with trim in that corner, but in the meantime (aka over Christmas break) Max and I painted the walls.
Can I just tell you how much of a job this was? I was all, oh, it's not that big of a room, it'll be fine. Um, yeah. There's also a staircase, three doorways, two columns, a built-in bookcase, and four windows. It took a while. But it was totally worth it. Check out the before and after below -
Huge difference, right?

And the stairwell where I ended the paint for the upper hallway (no, you're not imagining that it's a different wood paneling color):

Some in-progress photos:
|
| packing tape works great to protect carpeting, tuck it in tight with a putty knife |
 |
| the corner where the built-in was |
 |
| one of the columns supporting the beam |
And - the walls are done! I even hung up my pretty mirrored star that I've had sitting in the closet for months, waiting... And, yes, I obviously did not pick up the room before taking my after photo. Whatevs, I'm just happy I got the walls painted!

Monday, March 11, 2013
Peanut Butter Whoopie Pies
 For an ah-maze-ing twist on a classic whoopie pie, try filling it with peanut butter frosting. Nom.
 Bake the cookie/cake as normal (I suggest using Redbook's recipe and make them all chocolate). To make the frosting, mix 1 cup creamy peanut butter, 1 cup powdered sugar, 1/2 stick (1/4 cup) softened butter, and approx 1 Tbsp milk to a thick frosting consistency. Spread between two cookies/cakes to make your whoopie pie, and enjoy!
BTW - I cooked them two different ways - on parchment paper as well as in a muffin top pan. Cooking them on parchment paper resulted in a firmer cookie that didn't fall apart, though slightly less perfectly round than the pan yielded.
While eating one, my friend might have proposed to me, but it was hard to tell with that much cookie in his mouth and all the happy noises and such. They're that good.
Friday, March 8, 2013
Friday Flashback
This time last year I was briefly MIA - so let's to back to 2011!
Happy Friday
An Adventure Filled Weekend
Seed List 2011 Edition
Happy Friday
An Adventure Filled Weekend
Seed List 2011 Edition
Wednesday, March 6, 2013
DIY Stair Box
 Materials:
 1 box 12-16" tall, no more than 8" wide, and 14-16" deep
Heavy tape like duct, masking, or packing
Approx 2 yards of fabric (one for covering the inside, one for the outside)
Hot glue gun
Scissors
Ruler
Box cutter
Step 1: Say, "Yeah, I can totally do this."
Step 2: Measure your stair rise and depth. Most stairs are 8" high and 8" deep, but double check, just in case. (mine were slightly over 8" with the treads and the carpeting) Now mark your box on both sides where you'll be cutting out a hole for the step.

Step 3: Cut a square out of each side of the box where you marked it (will probably be an 8"x8" square) but do not cut the bottom or end. If you want a taller box, tape the top flaps up to increase the height.

Step 4: Lightly score the bottom and end where the hole is, because you're going to be folding those parts to the inside of the box. A ruler and un-clicked pen help.


Step 5: And tape it all together, inside and out. Putting it on the edge of the counter helps.


Step 6: Cut your fabric. You'll cut two L shaped pieces for the inside and two for the outside edges (make sure your L's are facing the right side out), and one long, narrow strip for the interior bottom/ends and one for the exterior. The L's you can cut by laying the box on the fabric and tracing around the outside, giving yourself a 1" allowance on all the edges. For the long strip, measure the bottom and ends to get your overall length, measure the width, then add 1-1.5" for a turn-under hem.

Step 7: Get out the glue gun!
Start with the interior L pieces, and glue along the interior edges. I didn't put glue in the center of the fabric, but you could if you felt like it. Don't worry about a little overhang, that's a good thing! It'll get covered up by the long strip, and ensure that you don't have cardboard peeking out in the final product. When you get to the top, turn the fabric over the exterior edge. Now do the long strip, turning under the edges by 1/2" as you go so there are no exposed raw edges or cardboard.
I tried taking pictures of the interior process, but it's all just a mess of fabric, cardboard, and glue gun. Have faith, it'll work out!
Do the exterior similar to the interior. Start with the L's and fold the excess over to the bottom and ends - but when you get to the top edge fold the fabric under itself so you have a clean edge. Then do the long strip, turning the edges under as you go.
If you mis-measured, don't worry! Just add a few pretty patches or bias tape and pretend that you meant to add an embellishment there the whole time. Or if it's a big whoops - cut some more fabric and add another layer. No one will see the original layer, you'll just cover it all up.
 |
| turn under at the top |
 |
| wrap the edges of the L, and turn under the edges of the long strip |
Step 8: You're almost done! Now just get out the iron and do some touch-up on the exterior. A little heat along the glue lines will re-melt it a little bit and allow you to readjust if needed, or to just get a crisper edge.

Step 9: Just kidding! No step 9, you're all done! We're using ours for winter accessories, but it makes a great catch-all!


Tuesday, March 5, 2013
Bird Treats
What do you do when bagels go stale? Make bird treats!
Let the bagels get really stale, smear with peanut butter, then roll in bird seeds. Thread some pretty ribbon through, and you've got a tasty treat for your feathered friends!

Let the bagels get really stale, smear with peanut butter, then roll in bird seeds. Thread some pretty ribbon through, and you've got a tasty treat for your feathered friends!
Monday, March 4, 2013
Fun Patches
I'll keep this short and sweet.
Iron on patches don't have to be boring - cut them into fun shapes before firing up the ole flatiron. (also, test a small bit on a scrap piece of fabric to make sure the glue is still viable before you try to iron on faulty patches)
Max loves his raincloud knee and his night night knee. :)

Iron on patches don't have to be boring - cut them into fun shapes before firing up the ole flatiron. (also, test a small bit on a scrap piece of fabric to make sure the glue is still viable before you try to iron on faulty patches)
Max loves his raincloud knee and his night night knee. :)
Friday, March 1, 2013
Subscribe to:
Posts (Atom)