Showing posts with label projects. Show all posts

Tuesday, May 10, 2016

Hack: Business Card Holder from Video Tape Case

Do you have a bunch of these laying around the house, collecting dust? No? Just me? Well, joke's on you because I just super-simple hacked them into business card holders. BOOM.

Start with a little video tape recording case, which is the perfect size for a business card holder. I haven't tried it with a cassette case, but that might work too. (if you ask what a cassette is, I can't help you)

Brace yourselves, this is going to get SO COMPLICATED. LOTS of steps.
Nah, I'm joking. This is super easy.

Step One: Open the case and remove the old paper (if it's still in there)


Step Two: Take the two sections apart.

Step Three: Turn the top part around.

Step Four: Carefully shove that top part into the bottom, lining the peg and holes if you can. You're just re-assembling it backwards.

Step Five: Adjust as needed so it stands up and the top part leans back slightly. Add a bit of tape on the bottom across the two pieces so they don't wiggle.

Step Six: Add your business cards and admire your amazingness.

Step Seven (optional): Make more because you are a friggen boss.

Thursday, May 5, 2016

Max's Shelving: The Resolution

FINALLY - Max's shelves are DONE.

Honestly, the project wasn't that bad, just all of that lead up trying to make my life easier makes me shake my head at myself. I really should have just done the woodworking in the first place, lesson learned!

This was by far my most ambitious project to date, involving cutting grooves and doing A LOT of measurements, but it was completely worth the effort! I have some pics, but not a full tutorial since I was too in the zone to completely photo-document it. For now the shelf is secured to the wall in two places, eventually I'll add a 1/4" backer. Maybe. We'll see.

assembly plan and cut list
making the grooves for the shelves

the quarter round supports - glued and screwed

assembled!

(almost) all of the bins fit perfectly

completed shelves

completed shelves


Tuesday, May 3, 2016

Max's Shelving - The Reckoning

note the mix of white and brown supports
You know how on paper your plan is flawless? WELL. As it got closer to the end of the month, I thought I'd make my life easier and hang adjustable shelves as a temporary solution until I had time to make the big, beautiful shelf. Great idea, right? WRONG. I tried to use existing supports and buy new brackets... and they weren't compatible. Fast forward SEVERAL trips to the hardware store (boy, do I love small town living when I'm getting frustrated with a project and everyone knows about it based on how many times you're at the hardware store making returns).

missed the stud on that one by a good 2"
After sinking way more money into these "temporary" shelves than I wanted, and having leveling issues, and making more holes in the wall than I wanted, I went to put the bins on the shelf. The bins are 16.5" wide. Studs are 16" apart. Consequently, the bins ran into the brackets and wouldn't sit nicely on the shelf unless I hung the brackets above the bins, which gave several inches of dead space that I hadn't counted on, and ultimately made it so I couldn't even fit all of the bins on the darn shelves.

So I tore them all down, returned what I could, and spent the rest of the day making the wooden shelves like I should have done in the first place.

I'm very happy to report that my wooden shelf construction went MUCH more smoothly, resulting in a great system that holds all of the bins as planned! Finally! More on that next time.

Thursday, April 28, 2016

Max's Red Room - Shelving

I'm putting on my woodworker hat... and making a shelving unit for all of Max's very important things. Like that piece of paper from... yeah, whatever. He has a ton of kid crap that he won't part with. You know how it goes.

He currently has three of these bad boys to hold his stuff, but at almost-six he is obviously too grown up for that plastic bin business. SO obviously I got him some more plastic bins... but they're much cooler.

I love the Ikea TROFAST series, but I have no Ikea near me. <sads> However - shipping on just the bins wasn't ridiculous, so I decided to hack the frame! I used Ana White's design as a starting point, and totally loved what her reader CassieD did:

source
Instead of spending a lot of time bonding with my router, I decided to use 1/2" quarter round to make the supports (since I couldn't find the sliders that CassieD used) and some nice clear pine boards. My plan is similar with a three columns and a shelf on top:


I decided to put a supporting horizontal shelf halfway up the columns for added stability since my columns are much taller than Ana or CassieD's. 

Oh - the bunny self on the cut list? Yeah, I need to build some sort of rolling platform for Sugar Cookie's cage to sit on. That project is still in the early planning stages.

Tuesday, April 26, 2016

Photo Booth Art

I'm gonna eat you up!
Who doesn't love a good photo booth collage? I adore this one of Max and I so much I had to turn it into art!

A piece of scrap wood. scrapbook paper, watered down white glue, and a printout from the computer, and I have a fun and pretty display piece! AND it cost me nothing since I had all of the materials on hand!

Do you have a series of photos that you love but don't know how to make them look like they came from a photo booth? I highly suggest using PicMonkey. (I have no affiliation with them, other than I just really love their editing program) Using the collage option, choose the Ducks in a Row option from the left toolbar, selecting up to five spaces. You can leave it horizontal, or use the rotate tool at the bottom to make it vertical. If you want to change the background to black, click on the artist palette icon on the left toolbar. Once you've entered your photos, you can open the collage in editor and play with filters and such, which is how I set mine to black and white and added the black fading at the edges.

Thursday, April 21, 2016

Holding Love

I Love You project #2 - Holding Love
a ribbon loop stapled on back to hang it up


This project requires more adult participation than I Love You to Pieces - but don't be scared!

I started out with some scrap pieces of wood, though you could use canvas, poster board, or paper as a background. I covered the board with pretty paper and slightly watered down white glue a-la decoupage. Then it's a matter of layering on the photo, adding hearts or other embellishments, writing with marker, coloring, or whatever makes you happy.

The part that makes this the most-est special? Those hands/heart. Tiny hands! Like a heart! <squeal>

How did I do it? Two step process - first trace the child's hand on scrap paper and cut it out to make a hand stencil. Fold a piece of nice paper in half, nice side in. THEN trace the hand stencil onto the nice paper with the thumb and index at the crease, making sure that the tips of the index and thumb hang over the crease by just a smidge. That'll make the fingers connect. After you trace the hand, adjust the line between the thumb and index to make a smoother half-heart shape. Cut it all out, and you'll have adorable hands/heart!

Tuesday, April 19, 2016

I Love You to Pieces

With Mother's Day coming up, I thought I'd share a few of my favorite I Love You projects.

First up is I Love You to Pieces! Simply cut out a large heart, and then fill it up with bits and pieces of pretty paper, magazines, stickers, washi tape, etc. Max LOVED this project!

Thursday, April 14, 2016

Max's Red Room - All the Red

Red Room, Red Room... (The Shining, anyone?)
source

ANYHOW

Max has decided that he wants a red bedroom. Immediately I cringed since I'm all about the whites and blues and greens... But he's almost-six, and it's his bedroom, his choice. Red it is!

Most people would probably go with a bright red and go with a red/black/white car theme, or brick red Americana - but knowing his personality, I just knew he would wantit to be very jewel toned with rich colors, and above all cozy. Very bohemian. I found this inspiration picture for him - and now he wants all the things. The light, the headboard, the bedding... ALL THE THINGS.

I will try to humor him as much as possible - without breaking the bank!

First things first - picking the right red. It had to be a ruby color, rich with cool undertones, not too bright or warm. A soothing red. After getting a dozen paint chips from the tool store, I narrowed it down to Benjamin Moore's Drop Dead Gorgeous.


I know what you're thinking - that's pink! Not red! Bear with me here - his room has one window and very little natural light. When it's on the walls all the sudden it looks.... RED! Check it out! (excuse the fuzzy photo, my phone was not behaving)


Tip - spend some extra and get the top line Aura series that has the built in primer. I did his room in ONE COAT with NO PRIMER. That's virtually unheard of with red paint! If it was in a high-light room, I'd probably do a second coat, but that's still amazing. I was having mild anxiety after listening to all of these 10-coat red paint horror stories, so I listened to the paint tech and it totally paid off in time and money since I didn't have to buy more than one gallon. WIN!

Thursday, April 7, 2016

Pin the Nose on the Snowman & Snowball Toss

Two games for the price of one on this project - Pin the Nose on the Snowman & Snowball Toss!
Peek a boo!

I picked up two presentation boards (like these). I sketched out a rough snowman, and two circles for the snowball toss. I cut out the two circles from one board, and carefully traced it onto the second one and cut them out. Then I lined up the boards back to back and glued the center panels together for added stability (and the possibility of using the other side for a different design!). To make the holes a little smoother I lined them with masking tape.
with some paint

And, of course, I painted the snowman. Happy little guy, isn't he?

For the carrot noses I just used orange construction paper with a bit of rolled up tape on the back. For the snowballs, I used white felted dryer balls (which I make good use of in the dryer!).

The kids at the holiday party had a blast!

holes & glue

noses!

Wednesday, September 11, 2013

Super HeroGauntlets


Now, what super hero costume would be complete without gauntlets?? Exactly.

The easiest way to make them is to cut a little glovette from the sleeve of the shirt that you made the cape from - but often the sleeves are too big in circumference for little hands. So, to size it down, you can tie a seam!


Fold the fabric in half and cut a rectangle. Cut a thumb slit on the folded edge, and fringe the opposite edge. Then tie the fringe together, and you have gauntlets! I left the fringe on mine long, but Max likes his short and edgy.


Tuesday, September 10, 2013

Capes

Capes are really easy to make - just take an old shirt, cut up the sides from the bottom, angle in toward the collar, then cut around the collar and that becomes the neck hole for the cape. I snip the collar in the front and add a snap or velcro for easy release.

Usually I just use a shirt that already has a fun design on it (yes, we have a lot of capes around here!), but this time I drew on a spider web... Because Spider-Man is Max's favorite. :)


Monday, September 9, 2013

Super Heroes!

Max LOVES to play super hero. :) He would wear a cape all day, every day, if possible. And most days, he does!


I shall sneak up on Super-Max...

Oh no, he got me!


Wednesday, September 4, 2013

Dye it Black


As I've changed careers and pant size (I'm down another size, btw!), I've been reevaluating my clothing choices. While I still have my collection of business casual clothing, the majority of my time is spent in jeans, corduroys, and comfy pants. And shirts... well, let's say they need to be very washable. Spit-up and such.

Between taking old pants in to make them smaller, yard sales, and shopping the not-too-small-anymore clothes in storage, I had a nice pile to supplement my wardrobe. The only problem: they were all the wrong colors. I just don't really feel comfortable wearing colorful pants. Especially pink. So, into a black dye bath they went! (Along with a stained shirt, and a hand towel that snuck in.)

These items originally were (from the top):
Brown and blue hand towel
Light blue shirt
Olive green cords
Light olive/khaki yoga pants
Light blue lounge pants
Pink lounge pants

I love how putting all of these things in the same dye made them all different shades of gray, depending on the original color and the fiber content. The photo makes the bottom two items look almost blue, but they're much grayer in real life.

Wardrobe update: Complete. Cost: two boxes of black dye, and a quarter for the yoga pants.

Tuesday, September 3, 2013

Taking in Mending


I've recently decided to take in mending. After doing it for my dad, my husband, my son, and myself for years, I realized that I could make a few extra bucks in the evenings, so why not?

I mean, check out that perfect jeans hem. :)

So far I've had two happy customers.

Monday, September 2, 2013

Cat box box

This post is a little out of date, but when I sold the box at the yard sale recently I realized that I forgot to post about it last year when I (we) built it.

We used to have three cats, one of which was a nervous pee-er. He has since gone to a much quieter home where he has never had a peeing incident (aka - no toddlers). I have mixed feelings about that still, I'm happy that he's happy, but I still miss him. <sigh>


Anyhow - Max and I built him this cat litter bench last year. We used all wood that I found in the garage, left over from the previous homeowners. I don't have the pictures of the completed box, but imagine it with a hinged lid on top. We made sure that the slats were spaced for ventilation as well as kitty viewpoints (one cat likes to make sure no one will sneak up on her). The bench was much bigger than the litter pan, which was nice because it led to less litter tracking, and there was room for the extra litter, scoop, etc.

Max LOVED helping me assemble this. :) He called it his coyote hole (he was calling the cats coyotes at that point, quite the imagination), and the hardest part of the whole project was telling him that he couldn't play in it anymore.

And, like I mentioned, I built it for the cat that no longer lives with us. The new owners weren't interested in the bench, and the other two didn't really use it. So it sat in the garage until the yard sale, where another cat owner was more than happy to buy it for her furry babies.


Wednesday, August 14, 2013

Frugal Luxury (and a Natural Solution!) - Sugaring


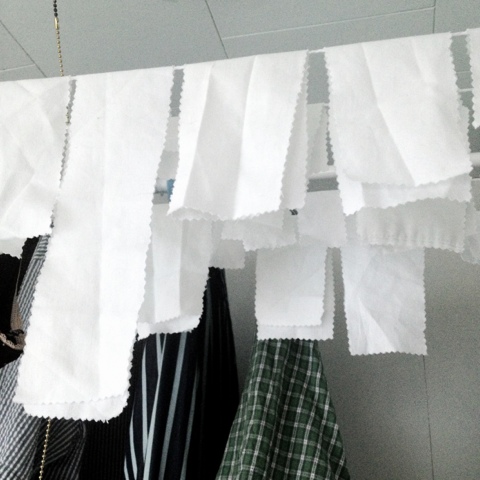
Here's a frugal luxury for you: at-home sugaring instead of waxing. I cut up an old cotton pillowcase into strips using the pinking shears, followed some handy instructions on DIY sugaring, and went to it.

For those of you who are scratching their heads - sugaring is a form or hair removal where you essentially make a carmel-like sugar mixture, spread it on your hairy areas, and rip it off with fabric strips. Just like waxing, but many prefer it over traditional wax.

Cost: a few pennies for the sugar and lemon juice. Waaaay cheaper than going to a salon, or even buying an at-home kit. Actually, it's cheaper than shaving too since you don't have to spend money on razors.

Monday, August 5, 2013

Yes, You Can Paint a Bike


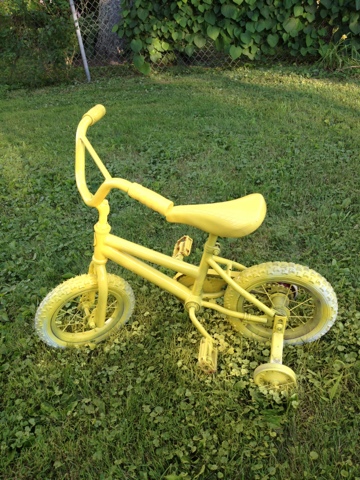
Last summer I got a bike for Max at a yard sale for $2. I was sure they left a 0 off the price, but I wasn't going to argue. It was too big for him last year, but now that he's 3 we're practicing. Max and I didn't have a problem with it being bright pink, but too many people are closed minded so I caved and painted it. 

Handy enough, I had his favorite color, orange on hand. I base painted it with yellow spray paint, then highlighted with orange. Not bad for $2 and leftover spray paint, right?

Tuesday, July 30, 2013

Non-Comfort Zone Curtains

Well, I finally got around to hanging curtains in the baby room - and I totally went outside my comfort zone and went bold. Like, bright yellow bold. Eeek!

I gathered some curtains that I had around the house, all white ones, and put them in a yellow dye. I cut up a flat sheet with this great leaf pattern that I'd been holding on to for the main curtains, and added the newly yellow valances on top. Originally, I was going to hang the long yellow curtain elsewhere, but as you can see below, the windows were lacking with just the valance. Well, maybe you can't tell in the photo. But they were lacking.

lacking something
So, I cut the large yellow curtain in half, and added it to the side. Viola! Instant drama, and balance (in an asymmetrical kind of way). Whatever, it works. And they were essentially free. Yay for stuff I had in my closet!

and, done!


pre-dye