Showing posts with label natural solutions. Show all posts

Thursday, July 14, 2016

Stupid Beetles

Thing are growing fast! Especially the greens, we're harvesting lettuce and chard several times a
poor bean leaves
week and can barely keep up! We put in a row of raspberries, leaving room for more.

But you know what's not so cool? BUGS EATING MY STUFF. The beetles have arrived, and they're working their way through my beans. A bucket of hot, soapy water is one of my favorite ways to deal with beetles. Knock them off the leaves into the bucket and they drown. No pesticides, easy peasy.
bye bye bugs

Wednesday, August 14, 2013

Frugal Luxury (and a Natural Solution!) - Sugaring


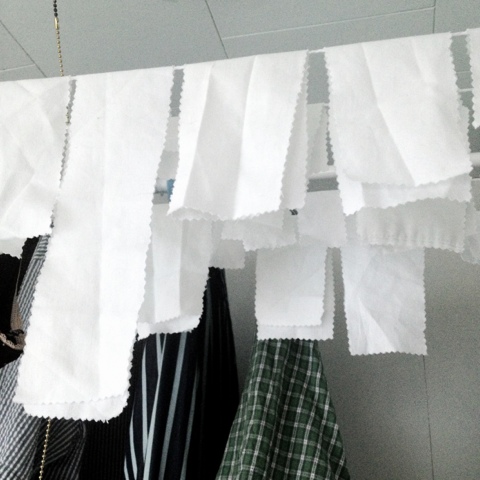
Here's a frugal luxury for you: at-home sugaring instead of waxing. I cut up an old cotton pillowcase into strips using the pinking shears, followed some handy instructions on DIY sugaring, and went to it.

For those of you who are scratching their heads - sugaring is a form or hair removal where you essentially make a carmel-like sugar mixture, spread it on your hairy areas, and rip it off with fabric strips. Just like waxing, but many prefer it over traditional wax.

Cost: a few pennies for the sugar and lemon juice. Waaaay cheaper than going to a salon, or even buying an at-home kit. Actually, it's cheaper than shaving too since you don't have to spend money on razors.

Tuesday, April 9, 2013

"Green" Smoothies

You know, green smoothies don't have to be green. They can be all sorts of colors - just getting that dose of kale or spinach (or green of choice) is the point.

I've been having the same thing for breakfast for the last few weeks, and I feel great. It goes a little something like:
  • Handful of kale
  • Scoop of protein powder/meal replacement (chocolate or vanilla)
  • A banana
  • A heaping Tbsp of plain yogurt
  • 1/2 cup of frozen berries
  • A crushed up multi-vitamin
  • Milk/green tea to cover

I blend it all together, and there we go! Easy, and usually brown. :) I vary the berries and whether I use chocolate or vanilla powder, that keeps it interesting enough that I haven't gotten bored. And it's actually holding me until lunch - go figure!


Monday, April 8, 2013

DIY Reusable Pads

Fair warning: We're talking sanitary pads today.

I've made several pads over the years, and through some trial and error I've finally figured out what works. You'll need a few pairs of well fitting briefs (think granny panties), some old washcloths, and snaps (I love my snap press, so much better than sewing them on). Optional is waterproof fabric like PUL, and old t-shirts.

Trace your favorite disposable pad onto some paper or cardboard to make your template. Then start cutting out the pads. I find that either three layers of washcloth or two layers of washcloth topped with two layers of t-shirt works well and will still make it through the sewing machine. Layer your fabrics, and if you're using it put the waterproof layer on the bottom and the t-shirt on top. Serge or zigzag stitch around the edges. Trim any excess, and you have a pad!

Pad snapped into the panties.
Install a male snap at one end of the pad and a female at the other. If you want to install the snaps before sewing all the layers together you can, just make sure to put it through at least two layers so it doesn't rip out of the fabric later when you go to use it. Install the snaps the same distance apart on each pad.

Now install a male and a female snap on your undies at the same distance apart as on the pads. Use some extra material to reinforce the snaps when you install them, again to prevent the snaps from ripping out.

Done! You can change out a pad as needed, and fold it in on itself to prevent a mess. You'll have to change more often than with disposable, so make plenty - I suggest a pair of undies for each day, and a half dozen pads a day. I prefer doing more laundry versus sewing more pads, but you'll figure out what works for you. Speaking of laundry, I just throw them in with the towels.


Snaps on each end - fold it in on itself for transport


Finished pad - it doesn't have to be pretty, that's up to you, you're the one looking at it. I go for functional.


Wednesday, March 20, 2013

K-cup Seed Starting

I work in an office, and offices nowadays have K-cup machines. AKA individual little plastic thingies to make coffee that aren't recyclable or compostable. But - they are reusable!

I've had a jar next to the coffee machine for the last month or so, asking people to save their cups for me. I've been taking them home and prepping a week's worth or so at a time.

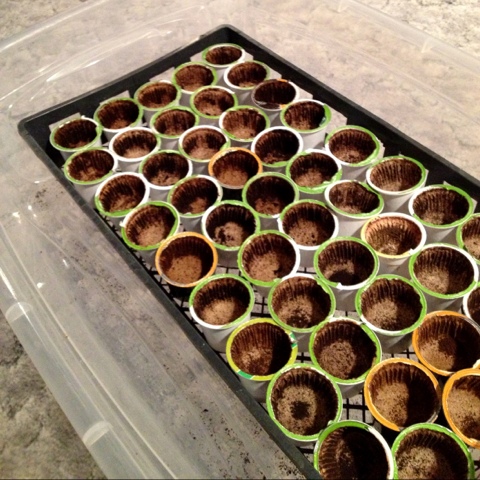
Cut the top off (which is recyclable metal, if your recycling center will take small pieces), scrape out the coffee grounds (and put them in the compost), and you're left with a paper filter inside of a little plastic container that has a built-in drainage hole. Perfect!

I lined them up on a seed tray set in a clear tote (which works as a mini greenhouse), added potting soil and seeds, and gave them a good watering.

For even more re-use fun, I cut old twist ties in half and used them as color-coded seed markers. Since I'm starting a lot of tomatoes, I put a dozen or so in their own "greenhouse" - a salad container that my mom saved for me.

A nice part about the cups, since the liner stops a few mm above the plastic, if there's a little bit of water in the bottom of the tray you don't have to worry about the dirt sitting in water - they're already elevated. AND, in theory I should be able to cut out the paper and plant that directly in the ground along with the seedling.


c'mon baby tomatoes!

Wednesday, January 30, 2013

DIY Tinted Sunscreen w/ Moisturizer

I admit: conventional sunscreen kinda freaks me out. All of those chemicals... so I stopped using it, and switched to zinc based natural sunscreen. And by switched, I mean I tried several, hated that they turn my already pale skin paler and chalky, and gave up wearing sunscreen.

The other day I was wishing that I could just make a tinted moisturizer/sunscreen like I used to in high school. Then I smacked myself in the forehead for being an idiot, grabbed some supplies out of the bathroom, and made myself some.

Ingredients:
Sunscreen (preferrably a natural one that absorbs well)
Lotion (a fairly thin one that you like to use on your face)
Powdered or liquid foundation slightly darker than your skin tone (bonus points if you use a natural mineral foundation)

Put your sunscreen in a bowl and mix in lotion until it gets to the consistency that you want. Generally the natural sunscreen is pretty thick, hence why I suggested a thinner lotion. Then start adding foundation and mixing until when you rub the concoction on your face it disappears.

This may not work on all skin tones, I'm pretty pale so it worked well on me - I put it on half of my hand, and you can barely tell!


Tuesday, December 4, 2012

Grape Vine Wreath

To continue the hand-made decor, Max made a wreath. He's very talented, no?

Ok, maybe I helped a little. And by helped a little, I mean made the wreath. But he picked out which vines to use.

I'm lucky (haha) to have a bunch of scrub brush bordering my lawn, which includes a plethora of wild grape and Virginia creeper vines. Max and I took a walk through the "woods" and collected vines that I wrapped as we went.

If you have access to vines, making a wreath is remarkably easy. Just wrap them into a circle, and feed the occasional vine through the middle and wrap it around the edge to secure it. Even easier is to just bend them in a circle then use twine or yarn to wrap around it and secure.

For a bit of color I added some dried sedum flowers, but didn't glue them down in case I change my mind later. I have a feeling that I'll be replacing them shortly with some pine boughs and a bow...

To glam up the wreath I spritzed it with a light coat of gold spray paint. Then to hang it I used a very expensive and complicated method - I went through the scrap fabric pile, found the cuff from when I hemmed hubby's jeans, cut the edges with pinking shears, and tied it over the door.

(almost) free door decor. What's in your yard that might be decor worthy?

Monday, December 3, 2012

Homemade Centerpiece

Max and I went around the back yard to find inspiration for our holiday decor. We ended up with some dried sedum flowers that still had some great color, maple seeds (or helicopters) that I glitzed up with some gold spray paint, and grape vine.

I assembled them into a pretty pedestal vase I pulled out of the closet - and viola! A beautiful, nature inspired centerpiece.

Tuesday, June 26, 2012

Sunscreen Success!

image source
I finally found a sunscreen that A: does not make me break out, B: isn't greasy, C: isn't completely full of awful chemicals, D: doesn't turn me bright white from the zinc, and E: works!

Banana Boat's Natural Reflect. No, this isn't a sponsored post, tho if they want to send me product I'd be majorly appreciative. I picked up the Kids version to check out since I was sick of the other products I've tried failing one or more of my above list and I'm constantly on the lookout for a good sunscreen that passes my evaluation. This one does, for sure! I've been using it on myself and on Max this summer and it's really fantastic. I'm not the only one who thinks so, Mandi at Green Your Way did a review as well. (she also did a great sunscreen review last summer too)

Wednesday, June 20, 2012

Natural Solutions: Boiling Water Weed Killer

Did you know that boiling water will kill weeds? Well, now you do. It's not practical for large areas, but cleaning up around the driveway or the front walk works pretty well. And it's practically free.

Step 1: Boil water.
Step 2: Carefully take boiling water outside.
Step 3: Pour boiling water (well, very very hot water at this point) on the weeds, making sure to focus on the base/root of the plant.
Step 4: Wait a few days. The leaves eventually die back and the plant goes away. I'd show after pictures, but who wants to look at gravel?

You could be a bit more proactive than I was and cut back the plant first... but that would have required more effort. And I was genuinely curious how this would turn out on a large, stubborn weed.

one of the large, stubborn weeds in question
The weeds are gone, by the way.

Wednesday, April 18, 2012

Frugal Luxuries & Natural Solutions: Spring Cleaning


It’s that time of year – Spring Cleaning. Yes, that deserves caps. Spring Cleaning doesn’t have to break the bank or add toxins to your house. There are tons of articles out there, but I thought I’d share some of my favorite tips.

My favorite cleaning products are these: Four Homemade Cleaners and Method. They’re inexpensive (especially the DIY ones) and very effective. As a side note, I don’t know about you, but the house doesn’t smell clean until it smells like lemon Pledge. But because I love to use natural, DIY cleaners I get the same effect by putting lemon oil or lemongrass essential oil in all of them to make them smell right. If you also have scent hang-ups, try a few drops of essential oil.

I recently (as in sometime in the last year or two) got a dust mop – and I had no idea what I was missing. It has a removable terrycloth scrubbing pad that you throw in the wash when you're done making it very reusable with very little waste. If for some reason I wear out that pad, an old towel, some elastic, and a little ingenuity would get me a new one. Gone are the days of a mop and bucket – now I spray the floor and mop away. Glorious. It’s super handy (dry or just slightly damp) for dusting up around the ceiling and the walls, especially in the stairwell when there’s no way in heck I’d be able to reach otherwise.. And of course I can use it dry to sweep/dust the floors. I got mine for less than $10.

Speaking of dusting, a professional cleaner recommended tying a rag (think old t-shirt) around your duster and then spraying it with an all-purpose cleaner or dusting solution to make it slightly damp before doing your major dusting. Of course it won’t be up to fine detail work, but it will do great on the tops of ceiling fans, around the doors, the tops of the blinds, etc, and make your duster last longer.

Spring Cleaning isn’t all about cleaning away dirt, btw. It’s also the time to go through your stuff. Declutter, organize, get your groove on, you  know the drill. As I go through the house the yard sale pile is growing ever larger…

How’s your Spring Cleaning going?

Tuesday, March 27, 2012

Stop Brushing Your Hair - Update

I haven't cut my hair in quite some time. I added some long side swept bangs this last fall, and I cut it... last summer? But that wasn't exactly a cut so much as a shaping. Because, (drumroll please) I'm letting my hair grow out.

Yes. My hair has been touching my shoulders for quite some time now. I haven't had it this long since... once in college, and before that it was 10th grade. I haven't majorly cut my hair since right after Max was born, and he'll be two in June. I took off a little length when I shaped it, but that was to make it less A-line (which looks awesome short and upkept, but not so much long and grown out).

Today is the first day this since fall that I haven't either worn it in a ponytail or blown it straight. I wasn't sure if the waves would come back with the added length and weight, but I was pleasantly surprised - I've got some sexy waves happening. What do they call it? Beach hair? Something like that. I described it to hubby as, "Sexy bedhead waves type of thing." Because I'm specific. It's also really windy today, so it's got an extra messy element.

Monday, January 16, 2012

Me Versus the Head Cold: The Result

I won. BAM, take that head cold!

I have to say, taking an airborne three times a day really did the trick (that's the maximum suggested). I'm sure the neti pot helped too, but not as dramatically. You know how normally when you're sick you feel worse by the end of the day, especially if you're at work? Well, Friday I actually felt noticeably better at the end of the day. Like, I got my voice back, stopped coughing, and my coworkers stopped giving me that look, you know, the one like they want to spray you with Lysol.

The part about the airborne I like the second best (directly after it made my head cold go away) - the only artificial thing in it is the flavor.

Monday, December 12, 2011

The Sniffles and Coughs

image source
Max had a cough last week that was keeping him up (and of course, me as well). It wasn't nearly bad enough to go to the doctor, just one of those irritation coughs that gets worse when you lay down to sleep. Since he's just barely 18 months old there's not a whole heck of a lot that I can give him. I went to the store to buy some honey and while I was there I thought I'd check the pharmacy. Lo and behold: Maty's makes not just one but two kinds of cough syrup that are totally natural and safe for kids over one! (they contain honey, hence over one) I read the ingredients and was impressed that everything was normal sounding - no chemical crap. I got the banana flavored one since Max is a total banana-holic. I also picked up the baby chest rub which is for 3 months and up. I don't think I've seen anything else that is approved for as young as three months old!

I was impressed in the store, but hesitant that it would help his cough. But you know what? It worked. I gave him a teaspoon of syrup (which is thick, like caramel ice cream topping), slathered his chest, neck, under his nose, and the bottoms of his feet with the chest rub, and within 20 minutes his coughing had subsided and he was sleeping. I didn't have to keep him propped up all night, though I kept him in bed with me (hubby opted for the couch) for most of the night so I could keep a better eye/ear on him. Man that kid kicks like a mule. I had to re-administer in the middle of the night which was interesting, but again it worked. Considering he's so young I highly doubt it was a placebo effect.

So - I definitely recommend these two products. And as a pleasant side effect, my hands are softer this morning from the chest rub. I didn't receive any sort of compensation from Maty's, I just feel that it's good stuff. If they ever want to send me free products I wouldn't mind... I'd certainly appreciate it!

Wednesday, September 14, 2011

Freezing Blueberries

The blueberry season has almost passed, but we managed to pick a few pounds the other weekend. Max “helped” me the whole time… He quickly figured out the whole, “Mommy drops the blueberries in the bucket, I can reach in the bucket, and blueberries can be smooshed in my mouth as fast as possible,” thing. I didn’t think that he could eat that many blueberries without getting a massive stomachache – but he managed just fine. That kid has a stomach of steel.

Even with the help from Max, hubby and I managed to pick three and a half pounds. We ate a bunch fresh, and the rest I froze. First I spread them out on old baking sheets, picked over them for stems, and froze directly on the sheets. Then I transferred the frozen berries to a quart sized freezer bag (yes, that’s all that was left). The freezing in one layer on sheets keeps them from sticking together, and makes it much easier to portion out without thawing.

Friday, September 9, 2011

Re-Waterproofing Cloth Diapers

Recently I got a huge windfall. My cousin, who cloth diapers her two children, gave me a bunch of pocket diapers that had lost their waterproofing but were otherwise in great condition, figuring that I could use them for parts. After staring at them for a week or two, dreading tearing apart otherwise perfectly fine cloth diapers, inspiration hit: I was going to re-waterproof them by sewing in new waterproof fabric (aka PUL) on the interior of the diaper.

I grabbed the massive amount of PUL fabric that I’d bought (check out Celtic Cloths for a great explanation of the type of PUL to purchase - trust me, don’t get the other stuff) and set to work.

Just to be clear: These are instructions for pocket diapers, not all-in-ones. I still haven’t figured out how to do it for the AIOs… when I do I’ll let you know.

Materials: Cardboard, Marker or Pen, PUL (1ml or 2ml), Sewing Machine, Thread, Scissors, LOTS OF PINS

First: Make a template. I suggest using sturdy cardboard. (I used a pizza box because I'm classy like that.) Take the diaper and trace it on the cardboard, making sure to stretch out the elastic so you have an accurate size for the fabric. There is no need to adjust for a seam allowance, just trace the diaper exactly on the cardboard.

Second: Trace and cut the PUL. Using your template, place it on the PUL and trace. Cut out your PUL. Again, there is no need to adjust for a seam allowance, just trace exactly. Keep in mind the interior of the diaper when tracing the PUL – for example, I did not cut out the tab areas since the interior of the diaper has a seam there and the tabs don’t need to be waterproof.
notice the lack of tabs on top

Third: Insert the PUL and pin. Insert the PUL into the pocket of the diaper and pin it in place around the edges, stretching the elastic and making sure to get the PUL right up to the interior seam, all the way around the interior of the diaper. It’s very important to get the PUL right up to the interior seam to ensure that there are as few leaks as possible. Remember – any spaces between the PUL and the interior seam are potential leak areas.

Fourth: Sew. Put your sewing machine on a wide and long zigzag stitch. (4, 4 worked for me) Carefully sew around the edges of the diaper, making sure that you are sewing the PUL. Stretch the elastic areas as you sew. Remember to backstitch at the start and end of your zigzag seam. After you have sewn and removed the pins, double check that you sewed all of the PUL down by either turning the diaper inside out or by inserting your hand in the diaper and running your fingers along the inside of the seam you just made.  Trim your thread ends.

That should do it! I’ve found that was all I needed to re-waterproof the diapers. I still make sure to change the diapers often like I would with any cloth diaper, and I haven’t had any leaking issues (beyond the normal Max-pees-like-a-mighty-waterfall thing).

Tuesday, August 9, 2011

Tips from Models

I don’t look like a model. I don’t have a desire to look like a model. I look like a mommy and am proud of it. But it doesn’t hurt to implement a few handy tips from the pros. When I briefly worked with models here are the tips that I picked up that stuck with me:

Drink through a straw: it keeps your teeth whiter longer and helps keep your tooth enamel from eroding

Stretch your Achilles tendon: whether you’re wearing heels or not, flex your foot and stretch out that tendon several times a day to help prevent leg and foot aches

Wear a well-fitting bra: it makes you look bigger in the right places, slimmer in the right places, and most importantly your back won’t hurt as much

Sunscreen is your friend. Period.

Use a gentle cleanser and moisturize a lot: it does wonders for your skin. Personally, I like the oil cleansing method which cleanses and moisturizes at once.

Models get zits too: they probably get more zits than the rest of us since they have to put their skin through so much abuse for their job.

You don’t have to be perfect to be beautiful. When you see a model in a photo, remember that they have had professional help making them look perfect, both in person and digitally. When they walk in the studio they arrive with unstyled hair and a clean, makeup free face. They do not look perfect. They almost look like a normal person (except for the whole tall, thin, and good bone structure thing).

Monday, July 18, 2011

Posts Worth Reading: Frugal Beauty: How to Look Good on a Budget

image source
Frugal Beauty: How to Look Good on a Budget by Sierra Black on Get Rich Slowly. (BTW - if you haven't checked out Get Rich Slowly and you're at all interested in personal finance, you obviously live under a rock. Go. Now.)

To summarize: Sierra talks about how she saves money by not spending a lot on personal care products. The comments get pretty funny - the occasional dirty hippie reference, some back and forth commenting on whether or not to wear makeup, etc. The article itself is not that expansive and normally I'd just put it on my Friday roundup. However, the comments make it worth the special mention.

It also gave me an opportunity to round up some of my personal care posts. If you've been reading for a while, you probably know that I don't spend much money on personal care and I try to DIY it, but I do care about looking (and smelling) good. As long as the surface looks/smells ok, who really cares about how you got there? Whether it's expensive products or baking soda it's all smoke and mirrors...

  • I clean my face with the oil cleansing method and exfoliate with sugar
  • When I don't wear makeup, I clean my face with a homemade toner
  • I use minimal makeup when I do wear it (I don't like looking half-dead at work, so I always try to cover up those under-eye circles)
  • I dye my own hair using henna
  • I often (but not always) cut my own hair, and I'll try to extend the time between cuts
  • I let my hair go curly or pull it back to disguise a funny cut or white hairs
  • I am a moderate no-poo-er
  • I use sunscreen when I'll be outside (but not all day every day)
  • I shower every other day to every two days unless I get sweaty or dirty - in the summer that can easily to up to twice a day
  • I make my own deodorant
  • I use natural soap "seconds" that are funny shaped but still work just fine, and are a lot cheaper
  • I don't shave my legs very often, I just wear pants a lot (which also hides my ridiculously white legs that refuse to color which looks really funny when the rest of me is summertime tan)

Hubby stays pretty on the cheap too -
  • He has a beard (which I adore) which cuts down on razors and shaving cream costs
  • He shampoos his hair once or twice a week
  • I cut his hair
  • He's considering trying out one of my sugar scrubs to keep those beard follicles stimulated
  • He likes particular brands of deodorant, shampoo, and soap, which is fine since we can get them at Costco for less $
  • He wears spray-on sunscreen which doesn't get goopy with the beard
  • He wears a long-sleeve light weight jacket all summer to keep from burning when he doesn't have sunscreen on

So, what do you do to look/feel like an acceptable member of society? I won't judge if you don't. Just, please, don't be stinky - and yes, too much perfume counts as stinky.

Thursday, June 9, 2011

Frugal Luxuries: Cloth Napkins

I NEED this tablecloth!
Who out there owns cloth napkins? Raise your hands please. (pretend I can see you, and for those of you who are super paranoid, I do see you)

Those of you that own cloth napkins, good for you. Now answer me this: Do you use your cloth napkins?

Uh huh. That’s what I thought. Not many of you have your hands raised on that second question. (I’m looking at you, paranoid person. Really. You might want to double check your monitor.)

I have a set of gorgeous napkins by Vera Neumann that I got at an antique store. I LOVE HER DESIGNS. Wait, I need to say that again, this time in bold. I LOVE VERA’S DESIGNS. There, that’s better.

I love those napkins so much that I was afraid to use them because I knew they’d get stained, ripped, the edging would fall off, etc, and I didn’t want to ruin them. So they sat in my linen drawer for years. That’s just sad, folks.

So, I broke them free of their drawer and started using them. Yes, they’re a little frayed around the edges. But, you know what? I enjoy them so much more when I use them than when they’re stored safely away. If I can do it, you can too. Free those napkins, let them see daylight and food! (though you may want to avoid rib night)

Besides the obvious uses – wiping your fingers and mouth (and shirt front) while eating – there are other ways that you can use your napkins. Is your sandwich or snack not too drippy? Use a napkin instead of a sandwich baggie for lunches. I’ve seriously cut down on my sandwich bag use since I thought of that bright idea. Ideally, I’d like to make some reusable fabric baggies, but for now a few folds of a cloth napkin and the occasional rubber band do the trick.

I also use them at work - a cloth napkin wrapped around my utensils and stuffed in a cup looks relatively attractive on my shelf. I've had coworkers compliment me on my Vera napkins. (If only they saw my placemats and pillowcases!)

The benefits of using cloth napkins instead of paper? Well, let’s see. They’re reusable, and don’t take up much room in the washing machine. You can get them used, giving them a longer life and most likely keeping them from a landfill. I’d like to say they use less resources to make, but that could be argued. They’re pretty. They don’t fall apart and get little white paper bits all over your hands and face during especially messy meals. You can wet one down, wipe off a baby’s face (or your own), rinse and repeat.

You don’t have to spend a lot of money either – do you have a fabric stash? Break it out and make some napkins. If you don’t want to do tiny little hems around the edges, use pinking shears and/or do a zigzag stitch around the edge. If you have a serger, you’re golden (and you’re my current envy).

Antique stores and yard sales are other good sources, especially for everyday napkins that you don’t mind being stained. Ebay in particular is good if you’re like me and looking for a specific designer. (Have I told you how much I love Vera? Oh, I did mention it? Well, I just want to make sure I’m being thorough.) As with any fabric purchase, make sure to wash it, and I recommend using vinegar in the bleach rinse.

How do you use your cloth napkins?

Wednesday, May 25, 2011

Dandelion Greens

While weeding my garden the other day, pulling up dandelions and tossing them to the side (I usually throw weeds on the lawn and then “mulch” them – aka run them over with the lawn mower), I had a duh moment: don’t mulch the dandelions – eat them!

I gathered up all of those handy weeds, twisted the greens off the roots, and brought them inside. They got a thorough rinsing to get the mud off, and we were ready to go! I lightly steamed them in a pan of water (see photo) and enjoyed as a side dish with dinner.

Rather, I kind of enjoyed them.

Dandelion greens sound so great – they’re free, really good for you, free, easy to procure, free… But they still taste like dandelions. Which, as any kid can attest (because all of us ate those pretty yellow flowers at one point or another, right?) they’re awfully bitter.

The rest of my dandelion bounty stayed in the fridge for a few days (ahem, a week). I wanted to like them. I wanted to eat them. But not so much. (In case you were wondering, hubby wouldn’t go anywhere near them – they’re green after all – and Max doesn’t quite have the teeth for them.)

But, you know what makes dandelion greens taste like ham? A ham bone. Soup to the rescue!

A ham bone from the freezer, misc. veggies from the fridge, half a jar of leftover spaghetti sauce, leftover broth, a few potatoes, and those dandelion greens.

YUM. Ham flavored dandelion greens are so much better than steamed. I bet I could even get hubby to eat dandelions if they taste of ham. I have another ham bone in the fridge, maybe I’ll give it a try.

Have you tried dandelion greens? Or flowers for that matter? How do you make them tasty?