Tuesday, August 23, 2016

Rooting Roses

I have a rose bush that I found years ago in the mess that was the flower bed at my old house. Isn't it beautiful???


When I first found the rose, I was pretty sure it was dead. Just this hunk of root that was over an inch thick that I thought was a tree branch, but there was some thorny stuff coming out of it. So I gave it a chance, and I'm so glad I did. It moved with me, and has been sitting in the "nursery" next to the woods where we put plants that we don't know where to put yet. I'm sure it'll stay there for another year or two, and in the meantime I'm trying to take some cuttings and root them. Wish me luck that this baby grows!


Saturday, August 20, 2016

Bunny Feeding Station

This post is photo heavy - forgive me. Or not. I'm ok either way.

I have pet bunnies! Did you know that? Sugar Cookie and Henry. They're both dwarf Holland Lops, Sugar Cookie is grayer and Henry is browner. They're freakin adorable. :) They're also messy as heck, and bunnies do tend to poop while they eat. To encourage them to poop in their litter box, I keep their food dish in their litter box. And Henry likes to dump their food dish. Daily. It drives me nuts. So today I decided to make a feeding station ATTACHED TO THE WALL. That bowl isn't going ANYWHERE.


I forgot to take during photos, so here are some elaborate after photos. Cuz I'm a bad blogger for not completely documenting this. There are three stations - water bottle, food bowl, and hay manger. My goal was to build it using things I already had (minus the new food bowl).


The water bottle has two parts, the top is a piece of wire attached to an eye and secured to a hook with a loop in the wire.


The lower part supports the weight of the bottle, so I wanted something a little sturdier. I took a curtain rod support and reshaped it with a hammer, It fell a little short so I put a thin board under it rather than try to find something else to support it with.


Next we have the food dish. That was easy to attach, the bowl base has two bolts coming off the back that go between cage bars, then secures to the cage with a metal strap and some nuts. The bolts, handily enough, were just 1/4" longer than my board was thick. So I drilled a couple of holes, put the bolts through, and secured it with the nuts.


Lastly, the hay manger. It's meant to hang from cage bars also, so I gave it some wire to hang from. I made a little loop in each end of the wire and screwed it to the board through the loop with some large headed screws.


Lastly, I screwed it to the wall at the right height over the litter box, added the food dish and water bottle, and filled it all up! Henry is modeling it, below. Isn't he just too freakin cute?


Saturday, August 6, 2016

Stretching Stir Fry with the Garden

When you have SO MUCH CHARD and your friend gifted you with the motherload of zucchini what are you going to do? Make stir fry! Obv.

Well, we do it the easy way. We pick up the stir fry DIY bags from the freezer section when they're on sale (or we pick up a sauce packet) and then we add SO. MANY. VEGGIES. Rather than serve it over rice, we chop and steam chard, spiralize zucchini, and toss in some fresh green beans. Mix it all together and that 1-2 serving bag easily feeds 4+.

Our beets are finally ready to pick! Well, some of the bigger ones, at least. I think of it as thinning to let the littler ones get more sunlight (I purposefully crowd them). I wasn't sure about adding beets to a stir fry, but they make an amazing side dish!

Tuesday, July 26, 2016

BBQ Chicken, Snoodles, and Slaw Salad

I really wish I could come up with some catchy way to say BBQ Chicken with more S's. Slathered S'poultry? Nope.

On to the recipe! Or, rather, helpful instructions!

I've been craving some sweet potatoes lately, and I also recently found the spiralizer kitchen gadget that I bought months ago! When you spiralize a sweet potato, what do you get? Snoodles, apparently! (per my friend that's what they're called, so if that's not the case, I blame her)

If you're unfamiliar with a spiralizer, it essentially is this gadget that cuts vegetables into long strands of noodles. It's pretty sweet. Google that, stat.

My darling decided he was going to make broccoli & cauliflower salad, which is delicious, and obviously needed to be consumed with gusto and an appropriate main dish.

So. Between my craving for sweet potatoes, and the nummy slaw salad, and there being some leftover plain, cooked chicken in the fridge, adding BBQ chicken to the meal was a no-brainer.

Step 1: Make Slaw Salad. Chop broccoli, cauliflower, and crispy bacon pieces, and toss it all together with your preferred coleslaw dressing (and maybe add a little honey for some extra sweetness). Let it sit in the fridge for a few hours before serving.

Step 2: Spiralize your sweet potatoes, toss with some oil (or leftover bacon grease if you're awesome like me), and bake in a 400 F oven until tender.

Step 3: Chop your already cooked chicken, toss with your preferred BBQ sauce, put it in an oven-safe bowl, and pop it in the oven next to your snoodles to get all nice and toasty warm.

Serve the chicken over the snoodles, and the slaw salad on the side. Or all touching and happily coexisting in the same bowl like I did.

Thursday, July 21, 2016

DIY Green Smoothie "Powder"

Right - so this whole idea started because I have SO MUCH CHARD in the garden right now. Like,
trimming and laying out the chard for dehydrating
I'm *almost* sick of eating it. Almost. So I decided to start preserving it now - and rather than go with the traditional freezing of the chard, I decided to dehydrate it! Super easy.

Step 1: Clean the chard.

Step 2: Dry the chard.

Step 3: Trim off the stems, and save those for making bean salad (use to replace the celery).

Step 4: Lay in a single layer in your dehydrator, or place right on the oven racks like I did.

Step 5: Put your oven on the lowest setting (mine goes down to 150 degrees F) and let it cook for... hours. Like, three hours, or until it's dry and crumbly.

Step 6: Put it all in a food processor and whip it, whip it good, until it's all finely ground.

Step 7: Store in an airtight container.
I'll call that done!

You can add it to green smoothies, soup, dip... and other cooking things. Sorry, not super creative with the how to use it right now. BUT I'm sure that you'll think of something!

BEWARE - allllll of that chard in the first photo dehydrated down to less than a cup of chopped, dried greens. Don't add a ridiculous amount to your smoothie, a whole salad's worth comes to just a couple of teaspoons. If you add more than that you take the risk of... well, probably a lot of time on the potty.

Tuesday, July 19, 2016

Thursday, July 14, 2016

Stupid Beetles

Thing are growing fast! Especially the greens, we're harvesting lettuce and chard several times a
poor bean leaves
week and can barely keep up! We put in a row of raspberries, leaving room for more.

But you know what's not so cool? BUGS EATING MY STUFF. The beetles have arrived, and they're working their way through my beans. A bucket of hot, soapy water is one of my favorite ways to deal with beetles. Knock them off the leaves into the bucket and they drown. No pesticides, easy peasy.
bye bye bugs

Tuesday, July 12, 2016

Egg White Peel Off Mask

You know those nose strips that you get damp, put on your nose, let dry, and when you peel them off it's like a forest of gross coming off your face?

You can DIY that for pennies and do YOUR WHOLE FACE. Just an egg white and some single ply toilet paper (or two ply separated in half).

I just did this tonight and it worked. Pretty sweet! No photos, because eww. We don't need to go there. Watch this video for the how-to: https://www.youtube.com/watch?v=RtOJ9URjTUY

Thursday, June 23, 2016

Dinosaurs & Rainbows


Max had his sixth birthday party this weekend! Can you believe it? He's getting so big.

As is his usual, he requested a specific theme for his birthday party. This year was Dinosaurs & Rainbows. I can do that! He also invited his entire class... so I had to plan on approx 12 RSVPs and their parent(s). No problem... yeah. Slightly intimidating.

I did a few things to achieve this:

  • ordered a bag of 72 mini dinosaurs for favors
  • bought a freakin load of candy
  • filled the crockpot with hotdogs and bought five bags of various chips
  • had my friend Erin with Sweet E's make me some banging rainbow dinosaur cookies (which double as decorations when plated)
  • put out a bowl of multi colored mini marshmallows (huge hit!)
  • rainbow streamers
  • dinosaur themed table cover and rainbow themed plates
  • made dinosaur egg cake pops (like making regular cake pops but elongate one end of the ball so it's egg shaped before dipping)
  • made a dinosaur dig cake with a skeleton inside! I'm really proud of this one, it turned out great, and the kids thought it was fantastic!
  • as favors I made 21 dino egg pinatas. Paper mache + small balloons + spray paint + those mini dinos and all that candy + approx three hours of my life = EXTREMELY HAPPY GUESTS. Seriously, that was their favorite part of the party. I had them each choose one, then on three they smashed. It was glorious. The story behind why I would do something so ridiculous as make 21 egg pinatas? Well, Max REALLY wanted a pinata for his party, but it was eating at his sense of fairness that only one person would win. So his solution was that everyone has a pinata! Very fair, but I don't know if I'll do that again. It was easy, but very time consuming. In retrospect I didn't need 21, but the RSVPs were sketchy so I wasn't sure of the head count. In the end each guest got two (except Max) so it was doubly awesome for them.
I don't have pics of the pinatas, sorry. It was down to the wire getting those done, and by the time I remembered, they were smashed!
can you see the dino skull?
How about now? Can you see the skull?
The reveal! An Albertosaurus!

Tuesday, June 21, 2016

Mermaid Hair Maintenance

HELLO Mermaid Hair! (Or unicorn hair, which is probably more appropriate with this photo - I swear the umbrella in the painting wasn't intended to look like I have a unicorn horn. Just a REALLY AWESOME coincidence.)

So - you went to the salon or DIY'd it, and now you have funky colored hair. NOW WHAT??? How do you maintain your lovely locks to keep that color as vibrant as possible as long as possible?

Want to know the big secret?

DON'T WASH YOUR HAIR.

For reals.

Or, rather, don't shampoo it. The thing with having hair any color of the rainbow is that it's a temporary dye. It will only last 6-8 shampoos, and after that the color will fade pretty significantly. But don't despair! With some strategic hair care, you can totally get your color to last a solid month.

So what to do instead of shampoo? Here are some alternatives and my suggestions on frequency. Keep in mind that your hair may not be as silky soft as it is when you've shampooed and conditioned - but it'll still be clean! AND it'll be healthier because you won't be stripping (shampooing) and re-hydrating (conditioning) it constantly.

1: Rinse thoroughly with water. Get your fingers up in there and scrub your scalp, loosening the oils etc so that it will rinse out. Run your fingers through, squeegee out the water, and repeat. You can do this for 3-4 days at least before your hair will start to look funny. What's awesome about this method? Your hair will be easier to style! The residual oils will actually work a little like styling balm.

2: Wash your hair with cheap conditioner. Most inexpensive conditioners have mild surfacants in them that will gently clean your hair. You'll need quite a bit to work it all the way through your hair, more than you're used to. Get it really worked in, and don't forget your scalp, and run your fingers through several times. A wide toothed comb is handy for making sure you get it all the way through. Don't leave it on your hair for long, and rinse thoroughly. The longer you leave it on the more color will wash out. Personally I love the giant containers of conditioner with pumps from Costco.

3: Use cool water. Hot water opens up the hair shaft, allowing more of the color to escape. I hear it's also better for your skin to use cooler water (hint, hint). Don't freeze or anything, hypothermia isn't worth gorgeous hair, but avoid hot showers.

4: Use a depositing conditioner every other "wash." A what? These conditioners are tinted and will leave a little bit of color behind, slowing the fade. You've probably seen them in the drug stores for blonds, brunettes, and redheads. Using a blond conditioner is great for yellow and orange hair. Go for the redhead for orange and reds. To find the cooler toned conditioners you usually have to go to a beauty supply store (or online, which is my preference because I don't like shopping) Use blue tint for blue, green, and white hairs, and purple tint for purple, blue, silver, and white hair.

5: Don't over style. The more you fry your hair the more you have to condition, and the more color will be stripped as you condition it. Also three day old styling products get icky. Go as minimal as you can, maybe instead of product all over, just do the ends of your hair, or just the fly aways. Try changing up your hair style so its a little easier. Like - blow out and style on day 1, headband or barrettes pulling the hair away from your face on day 2, and a ponytail on day 3. Or just let your hair air dry and see what happens! Maybe your natural hair inclinations are good looking all on their own.

Questions? Hit me up in the comments!

Wednesday, June 15, 2016

Egg Drop Soup

Have you guys made egg drop soup yet? No? It's SO EASY.

Step 1: Bring chicken broth to a boil
Step 2: Whisk some eggs in a measuring cup or something else that's easy to pour from
Step 3: Slowly stir the boiling broth (not with the whisk, trust me), and at the same time pour a thin stream of eggs into the broth. It cooks on contact, and the swirling of the broth trails out the cooked eggs into ribbons. Really freakin cool, right???
Step 4: Add chopped chives or scallions, salt and pepper to taste. I put in a bit of fresh thyme since it was growing next to the chives, and threw in some chive heads for funsies.

You can mix it up with this soup so many ways with just herbs - or add some veggies and really go crazy!

For reference: I used 8 cups broth, 7 large eggs, 1/4 cup fresh chopped chives, 2 tsp fresh thyme leaves, and a pinch of salt and pepper.

Thursday, June 9, 2016

TEAL Raised Beds and Seedlings!

As you may have guessed - I actually stained the raised beds mid-May. The building of the beds happened on day 1, the dirt was day 2, the staining on day 4 or 5, and I planted by day 7. I'm just not so good at staying on my game with the whole posting updates thing. BUT - that means you get some cool reveals like THIS:


Instant garden!


Check out those tiny seedlings! And those pumpkins in the top photo - those were part of my egg shell starts! All of the seeds I planted did great. HELLO HOT HUMID WEATHER! Not so fun for the sweat glands, but AMAZING for germination.

You may note the fencing over the bed - that's to deter cats and critters from digging up my hard work. Once the plants are big enough I'll remove the fencing. I used the same stuff as well as some generic posts from the hardware store as a trellis for the beans. (that fencing was leftover from a play yard fence - yay reusing!)

Tuesday, June 7, 2016

TEAL Raised Beds!

one coat
WHEW it's been a busy couple of weeks! The raised beds are in, planted, and STAINED. They're gorgeous! We used a deck sprayer similar to this with a wand. Trust me - you want a wand. Trying to get a traditional paint sprayer or a can of spray paint level with the grass would have been awfully annoying.

dad going to town with the sprayer

I used a latex concrete stain recommended by the paint department, it was around $25 for a gallon. I thinned it half water half stain so it wouldn't gum up the sprayer, and we still had GREAT saturation even on one coat. The concrete blocks soaks it right up, so by the time we finished the last bed the first was dry. I wanted it to be super saturated so we did three coats total - and spent maybe half an hour with it.

I LOVE my teal raised beds! THEY'RE SO PRETTY AND TEAL OMG

(and major props to my dad for "helping" me stain the beds... and by helping I mean he totally did it for me while I pointed and took pictures)


Thursday, May 26, 2016

Raised Beds - Dirt

The raised beds have dirt! I know step two was going to be stain, but when your dad offers to fill them for you with the tractor you say yes. That saved me I don't know how many trips with the wheelbarrow. Phew!

Also pretty awesome? Max helped! Like, really helped, not "helped" like the cat helps you walk across the floor and trips you. Dad heaped the soil in the center of the bed, then Max pulled it into the holes with his rake, then I followed behind and smoothed it all out. Woo!

It'll make the staining process a little more interesting - but that's ok. I'll figure it out!


Tuesday, May 24, 2016

Concrete Block Raised Beds

What a GORGEOUS weekend, and HELLO SUMMER!

We worked on a few outside projects - including starting to assemble four concrete block raised beds. (BTW for anyone following the blog from before my hiatus - I moved, hence the need to start new garden beds)

The plan is to make them 64" square (four blocks on each end, and three blocks between), giving a four foot square interior garden space, as well as all of the holes in the blocks for planting. I got them laid out as well as some of the cardboard tucked underneath before the Sunday afternoon rain (and hunger) sent me inside. Cardboard? Yes, cardboard boxes flattened out will provide a barrier to kill the grass underneath, and by the time my plants are big enough to need to grow deeper the cardboard will have broken down enough for their roots to get through.

We're aiming to do most of our outdoor projects on a budget (per the usual) and make them pretty (again, per the usual). The concrete blocks are a great deal at $1.48 each at the local big box hardware store, and they won't break down like wood. Just over $20 for each bed frame, not including the compost. Unfortunately our compost pile is really just getting started, so we'll have to purchase compost this year. We do have a big pile of topsoil though - so there's another freebie!

After I get the cardboard tucked under I'll be staining them a dark teal. Yes, you heard that right - dark teal. :)

Tuesday, May 17, 2016

Blue & Green Swirl Cake

Yeah, I'm totally just posting gratuitous cake pics. Because I can. ;) But seriously - look at the difference in color just from changing the lighting! The "real" color is somewhere between the first two.

interior shot with indirect natural light

exterior shot with bright, direct natural light


Thursday, May 12, 2016

Hack: Stuffing Pillows

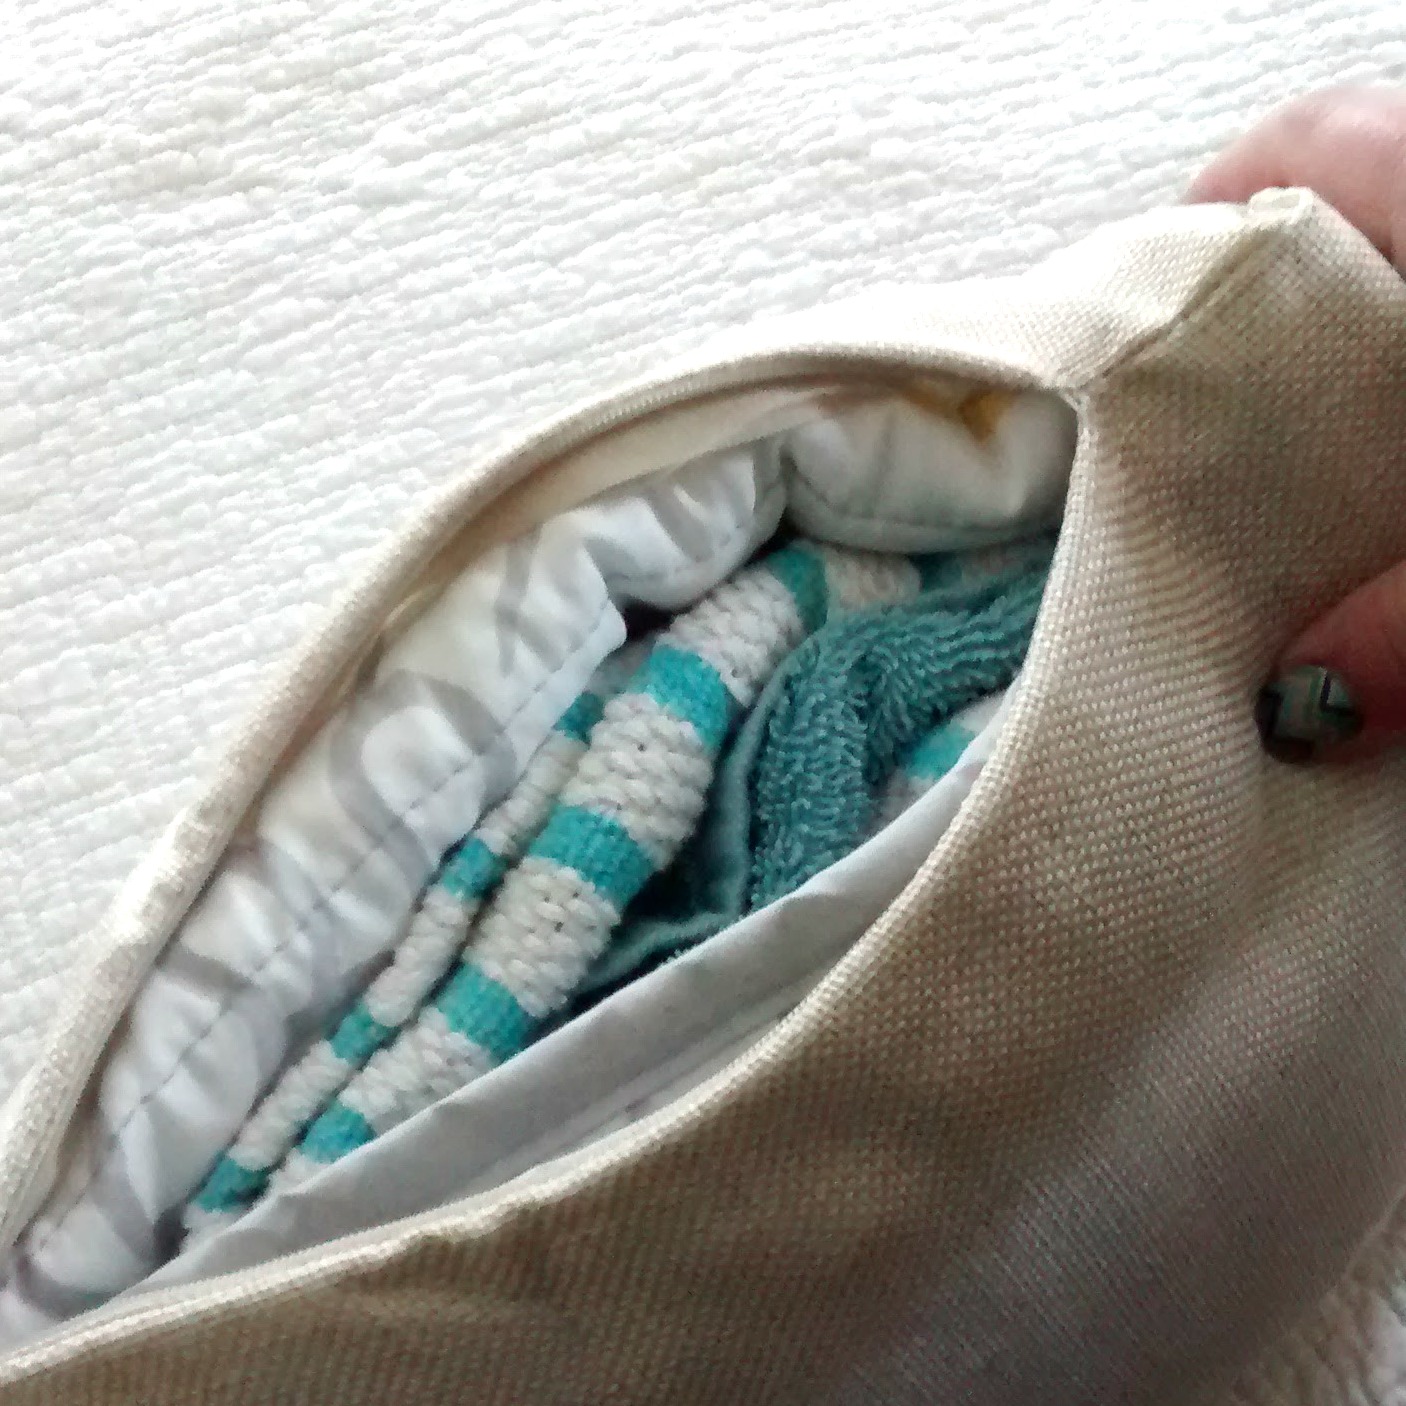
As a treat to myself for my new place, I bought some new throw pillow covers! I've never done that before, I've always made them. Such a novel idea... Anyhow - I ran into the problem that I didn't have enough of the right size pillows to fill the new cases.

Note to self: Measure things before buying.

Solution: Stuff the pillows with old towels, blankets, and pillow shams!

Just take your towels etc, fold them slightly smaller than the pillow case, and try to avoid lumps. Stuff your case, and viola! Fluffy pillow.


Tuesday, May 10, 2016

Hack: Business Card Holder from Video Tape Case

Do you have a bunch of these laying around the house, collecting dust? No? Just me? Well, joke's on you because I just super-simple hacked them into business card holders. BOOM.

Start with a little video tape recording case, which is the perfect size for a business card holder. I haven't tried it with a cassette case, but that might work too. (if you ask what a cassette is, I can't help you)

Brace yourselves, this is going to get SO COMPLICATED. LOTS of steps.
Nah, I'm joking. This is super easy.

Step One: Open the case and remove the old paper (if it's still in there)


Step Two: Take the two sections apart.

Step Three: Turn the top part around.

Step Four: Carefully shove that top part into the bottom, lining the peg and holes if you can. You're just re-assembling it backwards.

Step Five: Adjust as needed so it stands up and the top part leans back slightly. Add a bit of tape on the bottom across the two pieces so they don't wiggle.

Step Six: Add your business cards and admire your amazingness.

Step Seven (optional): Make more because you are a friggen boss.

Thursday, May 5, 2016

Max's Shelving: The Resolution

FINALLY - Max's shelves are DONE.

Honestly, the project wasn't that bad, just all of that lead up trying to make my life easier makes me shake my head at myself. I really should have just done the woodworking in the first place, lesson learned!

This was by far my most ambitious project to date, involving cutting grooves and doing A LOT of measurements, but it was completely worth the effort! I have some pics, but not a full tutorial since I was too in the zone to completely photo-document it. For now the shelf is secured to the wall in two places, eventually I'll add a 1/4" backer. Maybe. We'll see.

assembly plan and cut list
making the grooves for the shelves

the quarter round supports - glued and screwed

assembled!

(almost) all of the bins fit perfectly

completed shelves

completed shelves