Showing posts with label home. Show all posts

Saturday, August 20, 2016

Bunny Feeding Station

This post is photo heavy - forgive me. Or not. I'm ok either way.

I have pet bunnies! Did you know that? Sugar Cookie and Henry. They're both dwarf Holland Lops, Sugar Cookie is grayer and Henry is browner. They're freakin adorable. :) They're also messy as heck, and bunnies do tend to poop while they eat. To encourage them to poop in their litter box, I keep their food dish in their litter box. And Henry likes to dump their food dish. Daily. It drives me nuts. So today I decided to make a feeding station ATTACHED TO THE WALL. That bowl isn't going ANYWHERE.


I forgot to take during photos, so here are some elaborate after photos. Cuz I'm a bad blogger for not completely documenting this. There are three stations - water bottle, food bowl, and hay manger. My goal was to build it using things I already had (minus the new food bowl).


The water bottle has two parts, the top is a piece of wire attached to an eye and secured to a hook with a loop in the wire.


The lower part supports the weight of the bottle, so I wanted something a little sturdier. I took a curtain rod support and reshaped it with a hammer, It fell a little short so I put a thin board under it rather than try to find something else to support it with.


Next we have the food dish. That was easy to attach, the bowl base has two bolts coming off the back that go between cage bars, then secures to the cage with a metal strap and some nuts. The bolts, handily enough, were just 1/4" longer than my board was thick. So I drilled a couple of holes, put the bolts through, and secured it with the nuts.


Lastly, the hay manger. It's meant to hang from cage bars also, so I gave it some wire to hang from. I made a little loop in each end of the wire and screwed it to the board through the loop with some large headed screws.


Lastly, I screwed it to the wall at the right height over the litter box, added the food dish and water bottle, and filled it all up! Henry is modeling it, below. Isn't he just too freakin cute?


Tuesday, May 3, 2016

Max's Shelving - The Reckoning

note the mix of white and brown supports
You know how on paper your plan is flawless? WELL. As it got closer to the end of the month, I thought I'd make my life easier and hang adjustable shelves as a temporary solution until I had time to make the big, beautiful shelf. Great idea, right? WRONG. I tried to use existing supports and buy new brackets... and they weren't compatible. Fast forward SEVERAL trips to the hardware store (boy, do I love small town living when I'm getting frustrated with a project and everyone knows about it based on how many times you're at the hardware store making returns).

missed the stud on that one by a good 2"
After sinking way more money into these "temporary" shelves than I wanted, and having leveling issues, and making more holes in the wall than I wanted, I went to put the bins on the shelf. The bins are 16.5" wide. Studs are 16" apart. Consequently, the bins ran into the brackets and wouldn't sit nicely on the shelf unless I hung the brackets above the bins, which gave several inches of dead space that I hadn't counted on, and ultimately made it so I couldn't even fit all of the bins on the darn shelves.

So I tore them all down, returned what I could, and spent the rest of the day making the wooden shelves like I should have done in the first place.

I'm very happy to report that my wooden shelf construction went MUCH more smoothly, resulting in a great system that holds all of the bins as planned! Finally! More on that next time.

Thursday, April 28, 2016

Max's Red Room - Shelving

I'm putting on my woodworker hat... and making a shelving unit for all of Max's very important things. Like that piece of paper from... yeah, whatever. He has a ton of kid crap that he won't part with. You know how it goes.

He currently has three of these bad boys to hold his stuff, but at almost-six he is obviously too grown up for that plastic bin business. SO obviously I got him some more plastic bins... but they're much cooler.

I love the Ikea TROFAST series, but I have no Ikea near me. <sads> However - shipping on just the bins wasn't ridiculous, so I decided to hack the frame! I used Ana White's design as a starting point, and totally loved what her reader CassieD did:

source
Instead of spending a lot of time bonding with my router, I decided to use 1/2" quarter round to make the supports (since I couldn't find the sliders that CassieD used) and some nice clear pine boards. My plan is similar with a three columns and a shelf on top:


I decided to put a supporting horizontal shelf halfway up the columns for added stability since my columns are much taller than Ana or CassieD's. 

Oh - the bunny self on the cut list? Yeah, I need to build some sort of rolling platform for Sugar Cookie's cage to sit on. That project is still in the early planning stages.

Thursday, April 14, 2016

Max's Red Room - All the Red

Red Room, Red Room... (The Shining, anyone?)
source

ANYHOW

Max has decided that he wants a red bedroom. Immediately I cringed since I'm all about the whites and blues and greens... But he's almost-six, and it's his bedroom, his choice. Red it is!

Most people would probably go with a bright red and go with a red/black/white car theme, or brick red Americana - but knowing his personality, I just knew he would wantit to be very jewel toned with rich colors, and above all cozy. Very bohemian. I found this inspiration picture for him - and now he wants all the things. The light, the headboard, the bedding... ALL THE THINGS.

I will try to humor him as much as possible - without breaking the bank!

First things first - picking the right red. It had to be a ruby color, rich with cool undertones, not too bright or warm. A soothing red. After getting a dozen paint chips from the tool store, I narrowed it down to Benjamin Moore's Drop Dead Gorgeous.


I know what you're thinking - that's pink! Not red! Bear with me here - his room has one window and very little natural light. When it's on the walls all the sudden it looks.... RED! Check it out! (excuse the fuzzy photo, my phone was not behaving)


Tip - spend some extra and get the top line Aura series that has the built in primer. I did his room in ONE COAT with NO PRIMER. That's virtually unheard of with red paint! If it was in a high-light room, I'd probably do a second coat, but that's still amazing. I was having mild anxiety after listening to all of these 10-coat red paint horror stories, so I listened to the paint tech and it totally paid off in time and money since I didn't have to buy more than one gallon. WIN!

Monday, July 22, 2013

Painting the Bathroom

The downstairs bathroom (which is connected to the downstairs ugly room that I've been remodeling) is getting its turn. Mostly paint (my biggest "trick" when sprucing up the house) and a tiny bit of demo. Not that I'm the tidiest painter in the world, but I didn't notice this smudge until I went to shower that night.

I'll be posting more pics of both the bathroom and the bedroom soon as I finish it up.

Wednesday, May 1, 2013

Floor Update

drying after the scrub-a-thon
So, you know how I said I was going to rip out and replace that floor instead of refinishing it? I thought that if I wrote it down it would happen... not so much.

SO.

I scrubbed the beejezus out of it with an odor-neutralizing solution (baking soda, peroxide, dish soap, lots of water), and sanded it all down.

I'm happy to say - the smell is completely gone. Thank goodness, really, had it still smelled and I would have had to rip out the floor after all of that I would have been pretty cranky.

Now I just have to fill in the cracks and holes in the walls, ceilings, and floors - then on to paint!


sanded

Tuesday, August 7, 2012

Filing SCORE!

One of the best thrift store finds I've ever had, and I got it for a quarter:

image source
(no, that's not mine, that's the company's pretty photo)

There are so many articles and tips out there on how to organize paper and keep it off the dining table. For a lot of people, their paper piles up as mail. Me, I open the mail just fine and recycle most of it - but the paperwork that I need to file (bills, etc) gets put in a pile on top of the printer which sits on top of a little desktop shelving unit.
my fancy filing tote

The printer that we haven't used in five years.

Ugh.

After thinking long and hard about it, I realized that I will only put paper in folders if the folders are easy to see and access. The dusty tote at the bottom of the closet prior filing system was obviously not working, as evidenced by my complete lack of filing (for three years).

Enter: that desktop organizer. I just knew it would revolutionize my papery life, and for .25 cents it was meant to be.

Of course that desktop organizer has been sitting on the living room floor for about two weeks while I shamelessly avoided the ridiculous mess did more important things, but last night I sucked it up and completely cleared the printer area. The printer and a few other things went into the yard sale box, the shelf got set to the side for another use, and I set up the organizer. The hanging files that we use the most often immediately went in, and I'll add others as needed.

The bottom tray now holds that pile of to-do filing (which I was barely able to shove in there) and the top tray holds some scratch paper, five rolls of tape (no, I don't know why we have so many), and our double deck of playing cards.

This, I can handle.

Monday, August 6, 2012

Destructo-Gardening - the Pool Hole Part 1

I'd mentioned a while back that I'd hired a landscaper to come and do some demo in the yard to remove the pool hole, a flower bed, and pull some fence posts. Well, that was mid-April and it's still not done but I haven't figured out how to gracefully exit the agreement since it's a family friend... So, I'm doing a lot of the work myself.

Sometimes you must destruct to build anew. Bwahaha!

Mission: Pool Hole

Once upon a time, there was an above ground pool. Grandchildren splashed and played. Then new homeowners came along and didn't clean the pool for a while. Ew. Enter myself and hubby and a house contract that includes the removal of the yucky pool. Leaving us with a sloped yard with a 25' round, level dent filled with packed sand. I had visions of a knot garden, lots of herbs, etc.

Fast forward three years, pregnancy, child, and lots of weeds.

Well, my work was cut out for me. I don't normally like to use weed killer, but sometimes it's the best option. I sprayed the whole area, let it sit for a week and a half, then on a hot Saturday during nap time I went to work.

That's a pretty intense before, huh? I considered bothering my aunt to borrow her heavy duty brush whacker, but I needed to sweat, and pulling up from the roots is better than leaving potentially viable roots in the ground. I don't know if you can tell, but most of those weeds are as tall as I am if not taller (5'1"). Lots of cattails and goldenrod. And some sort of nasty fluffy looking grass that cut the poop out of my arms.

Fast forward an hour and lots of pulling, and we have this:
That's all of the weeds, pulled up and waiting for the wheelbarrow, yay!

Another hour of raking and dumping brush (and a tree that got cut down and tossed in there) out back, followed by a pass with the lawnmower set on low... and it's a big, sandy, stubbly circle, 25' across.

Woo-hoo! Ready for phase two (aka a layer of compost and topsoil, currently being negotiated on with the farm down the street). Phase three is being designed... and will involve a garden and a swing set!

Wednesday, June 6, 2012

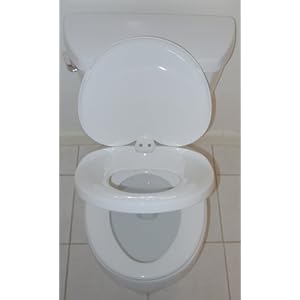
New Potty Seat

upstairs potty seat (image source)
I'm not about to show you a picture of our bathroom at the moment, sorry. BUT - we have a new addition to the bathroom, and Max couldn't be more excited. We've been working on this going potty business for quite a while now, but he likes using the big potty with no additions which has been cumbersome and means I have to help him quite a bit so he doesn't fall in. Not easy for anyone.

Then I remembered the awesome toilet seat that my friend got that has two seats, a little one and a normal one. Ah-ha!

Of course she got a cool, fancy, soft closing one that cost more than I was willing to pay (she also was potty training twins, so I absolutely don't blame her). Ours is much more modest, and when paired with a step stool that Max's great-grandparents gave him for Christmas it makes for almost completely independent potty time!

Max loves it, he moves his stool over, climbs up, wiggles back into position, and goes potty all by himself! He still can't reach the toilet paper from the toilet, which is probably a good thing since he would use a whole roll just to play with it. But it's fantastic that all I have to do now is strip him down and he can do the rest. Of course he could probably strip down by himself, but I don't want him to know that quite yet.

With the success of the upstairs potty seat, I ordered one for the elongated bowl downstairs as well.

Yay for potty time!

downstairs potty seat (image source)

Tuesday, April 3, 2012

Frugal Luxuries: Revived Towels

Mom, stop reading this. I'll never hear the end of it... (my mom affectionately calls me Rainbow whenever I do something she considers crunchy or Martha when I do something crafty - and this qualifies as both)

I have a lot of mis-matched towels. Are you with me on this one? You know, all of those random towels that you picked up 2 at a time because they were pretty and on sale but didn't match your current towels, or the stray ones leftover from your parents/roommate/ex that are perfectly usable, but might be a little ratty/discolored/faded?

When I got married I thought I'd have matching towels. It just seemed like something you had when you were married, matching towels. Not so much. Though I give major thanks to my Aunt L. who gave us white towels for a wedding gift - they're the wedding gift that I use the most frequently and I think of her often. And it makes the bathroom look so much nicer with a white towel drying on the bar instead of the once-blue towel with the frayed edges...

I've been thinking about trying out fabric dye, and what better fabric to test it out on than my old (not-white) towels? Perhaps if they're all the same color I'll stop hiding them from guests?

So I used a bottle of blue and a bottle of green (because I love me some turquoise/aqua/blue-green) and went to town. Well, before I went to town I used a packet of color remover (which did nothing) and then a round of bleach (which did something, but not a lot).

On to the color part! I followed the directions and let the washer fill with some water (not as hot as it should have been, thanks old house) added the dye and salt, and then added the towels. That I forgot to wet first. Whoops.
Pretty!

But, hey, the results were pretty awesome! They didn't turn out the same color by a long shot (what's up with the bright green one???) but they're all in the same color family, finally. You'd never know they started out life as pink, purple, blue, orangey-green, tan, etc. Well, except for that purple-ish one on the bottom, that one obviously started out purple. And they look lovely next to my white towels. The ones that turned out blotchy did so in an interesting way like I did it on purpose. Which I must have, of course.

For less than $10 I have "new" towels - and since I rinsed the dye bottles really well they went into recycling so there was no trash involved. Woo!

Monday, March 26, 2012

Brush Clearing - Buckthorn Beware!

I spent a significant chunk of time clearing out the space "behind" our shed. Technically it's to the left side, but that's where the forest begins and where the previous owners threw things, mostly wood scraps. Mind you, I use the term forest loosely. It had been cleared in the last 5-10 years so a lot of crappy shrubs/small trees had grown up - primarily buckthorn, an invasive species around here. I really wish I had done before pictures so you could really see the impact... but you can imagine, right?

See how clear that looks? That was packed with undergrowth up to and overhanging the fence. (the fence goes around the back lawn, keeping the kiddo from making a headlong run down to the gully) All in all I cleared around 250 square feet. Hells yes. I'm so friggen proud of myself.


Good trees versus bad trees: The turquoise arrow points to a maple sapling that will now have a shot at growing up to be a tree. The yellow arrow points to a buckthorn that was too big for my recriprocating saw to handle, so I girdled it and will take care of it later when it's dead. And by I will take care of it, I mean I'll have someone with a proper chainsaw come in to take down the larger trees. Between the two arrows you can see one of the two brush piles I created. My friends are all excited about a bonfire, but I really don't want to deal with that so I'll plant some morning glories on them and calling it good enough.

Oh, and it wasn't just brush - like I mentioned, the previous owner used it as a dumping area. Mostly for scrap wood, but also trash. I came out with a large trash can full. Nasty.

 See the clear-ish area between the arrows? That's the other view of the cleared area. A little harder to see in a photo, but that used to be brush right up to the pile of scrap wood (almost all of which used to be thrown back between those arrows). And I'm not done. <sigh> Thankfully the majority of the remaining work will be just brush and the occasional bit of trash, I shouldn't have to deal with too much more scrap lumber. Though there is a bit of fallen down fencing that I need to deal with, but that requires much more heavy duty wire cutters than I own so I'll have to wait until I can borrow some.

And did I mention that part of my method to remove dead brush was to jump on it? (I didn't want to waste the battery on my saw) Yeah. So I knew I was going to fall a few times, no big deal. I did miss my anticipated landing spot a couple times tho -

L: my side, R: my calf
They look worse than they feel.

Tuesday, February 21, 2012

Easy Backsplash

The kitchen re-do is slowing down, but has not yet ground to a halt. To go with the new counter top (and the repainted edge, it's now gray) I put up a tile back splash the other day - no grout needed. I picked up a bunch of 2"x2" off-white tiles at a garage sale last summer for $15 and have been itching to get them up in the kitchen.

Step 1: Clean the tile. Mine were pretty dirty, they'd been sitting in various garages for years. (that's not all of them, BTW, just what I needed for this project)

Step 2: If they have those little tab things or webbing on the back, cut them off. Be careful, I take no responsibility if you slice your finger, only if I slice mine. Not that that would ever happen.

Step 3: Put a little dallop of construction adhesive on the back of the tile. Make sure it's approved for both tile and the type of wall you have, in my case wood.

Step 4: Start in a corner that you want to look good. My "bad" corner is behind the microwave, though I must say it turned out pretty well. Smush the tile against the wall, give it a little wiggle to smear the glue more evenly, and move along to the next. Make sure to keep tight to your edges and set the tiles close together.

Step 5: Cut the tiles as needed to fit. I cut the tiles by hand with a tile cutter I picked up at the hardware store. It wasn't easy, but it did the job and $5.00 is a lot better than renting a tile saw.

Step 6: Let it dry and admire!
ignore the outlet
Since the back splash is not in an area that will get wet or dirty I didn't bother with grout, caulk, or sealers. For the back splash behind the sink I'll use some paintable silicone caulk to make it water tight.

Friday, February 10, 2012

How to ReCover a Couch - After

And, drum roll please!

Ta-da!

Now add some throw pillows and drape a blanket -


Perfection. Well, almost. Nothing is perfect without my little helper. :)


Now, go and recover that ugly couch. Then come back and tell me all about it!

Links below to the rest of the tutorial!
BEFORE

STEP 1 

STEP 2

STEP 3

AFTER!

Thursday, February 9, 2012

How to ReCover a Couch – Step 3

Now let’s cover the seat area.

Firstly, get a long piece of your fabric. If you have to join more than one piece I suggest making the seam(s) line up with the couch cushion(s). My couch has two cushions, so I would have made a seam dead center. If you want to get fancy you could even put in a pleat. Me, I’m not fancy. I just made sure I had a long piece.

Fold the end under itself by an inch or two so you don’t have a raw edge. You could sew it first (like a hem) if you wanted to, but the staples will keep it secure. Now line it up with that inside corner and staple along the inside (top) edge. Notice how this fabric piece overlaps that arm fabric? Nifty, I know. When you get to the further edge, again tuck under an inch or two.

fold the edge under and secure on the inside
Now flip that couch over, secure on the bottom side and trim the excess.


finished front edge, the stapling is done!
Cushions… I didn’t take any fun pictures of the cushions, sorry. It was late, and frankly there are much better tutorials out there than I could do. BECAUSE – I made the cushion covers just like a fitted sheet. “What?” you may be asking. Yes, I made fitted cushion covers with elastic and everything like a small fitted sheet. They come off easily for washing and were a heck of a lot easier than making a full pillowcase type cover. I suggest checking out this tutorial for fitted crib sheets at luvinthemommyhood that Dana from MADE did. (I seriously love both of their blogs, you should check them out!) Just adjust the measurements to the size of your couch cushions.

Or you can cover your cushions like you would a pillow cover, or put in a zipper, or any number of methods.

Links below to the rest of the tutorial!
BEFORE

STEP 1 

STEP 2

STEP 3

AFTER!

Wednesday, February 8, 2012

How to ReCover a Couch – Step 2

Ah, the arms. The arms took a good bit of thought and staring. (I do some of my best work after staring “vacantly” into space)

I wanted to do this with no sewing and no visible staples or tacks or anything like that. The couch has a rolled arm, so it wasn’t as easy as making some sort of standard gift package edge. I decided on a draped look that would show off the curve of the rolled arm.

Firstly, make sure that you have a lot of extra fabric overhang, you’ll need it.

Drape the fabric over the arm so that it is flush with the inside corner and hangs on the floor side by a few inches. Secure it with staples on the inside edge so it doesn’t move around. I also secured it on the floor side with a few staples so that it wouldn’t move around when I started pulling.

the arm is coming along...
Now, with those long front flaps o’ fabric – before you staple anything, play around with the fabric to see how you want it to drape. Think like you’re wrapping a really oddly shaped present.


Take the inside edge and pull it across to the outside, angling down a few inches. Keep the fabric taut and secure with staples. I secured directly under the roll of the arm into the frame. You may want to put a couple underneath the bottom as well.

inside edge is secured
Now take the outside edge and pull it across to the inside. Here you’re going to want to angle downward steeply, I tucked the fabric in on itself a bit to get a steeper, cleaner edge and a nice looking wrinkle. Pull the fabric all the way over to the seat area and secure on the inside. You’ll be putting more fabric over the front seat part, so it doesn’t have to be perfect. But perfection doesn’t hurt…

notice how the fabric goes across to the seat area
lots of staples - lots
Lastly, flip your couch over again and secure it all on the bottom of the frame.


Before you trim the excess you may want to tuck the extra under the couch and turn it upright again, just to make sure you really like that arm. Once you trim the extra fabric it’s a lot harder to change it. Needle nose pliers are super-handy at pulling staples.


Repeat with the other arm, and voila! We’re close to done!


Links below to the rest of the tutorial!
BEFORE
STEP 1 
STEP 2
STEP 3
AFTER!

Thursday, January 19, 2012

Washing Little Toys

Have some little toys (or other little things) that you want to wash, but really don't want to hand-wash them? Are they probably top-rack dishwasher safe? Do you have a mesh produce bag?

Put the little toys, such as alphabet magnets, into the mesh bag and run it through the dishwasher. Make sure you scrape the plates first tho - bits of food can get caught in the mesh. Ta-da! Clean toys.